How to Hang a Picture: The Complete Step-by-Step Guide
Learning how to hang a picture properly is one of the simplest yet most important home improvement skills. Whether you are decorating a new home, refreshing a room, displaying family photographs, or showcasing artwork, properly hung pictures can dramatically improve the appearance of your space. While hanging a picture may seem like a straightforward task, how to hang a picture many people struggle with issues such as crooked frames, damaged walls, poor placement, or insecure mounting. These problems can make even beautiful artwork look unprofessional and out of place.
The good news is that hanging a picture correctly is easier than many people think. With the right tools, proper planning, and a few professional techniques, anyone can create an attractive wall display that looks balanced, secure, and visually appealing. Understanding how to choose the correct hanging hardware, determine the ideal placement, and protect your walls can help ensure excellent results.
This comprehensive guide covers everything you need to know about how to hang a picture, including tools, preparation, wall types, positioning, installation methods, common mistakes, and expert tips. By following these recommendations, you can confidently hang pictures that enhance your home’s style and create a polished, professional appearance.
Why Proper Picture Hanging Matters
Many homeowners underestimate the impact that picture placement can have on a room. Artwork and framed photographs serve as focal points that draw attention and contribute to the overall atmosphere of a space. A well-positioned picture can make a room feel larger, more balanced, and more inviting.
Improperly hung pictures, on the other hand, can create visual clutter and disrupt the flow of a room. Frames that are too high, too low, or unevenly spaced often make spaces feel awkward and unfinished. Proper picture hanging ensures that your wall décor complements furniture, lighting, and architectural features rather than competing with them.
Additionally, secure installation protects valuable artwork and prevents accidents caused by falling frames. Investing a little extra time during installation can save significant frustration later.
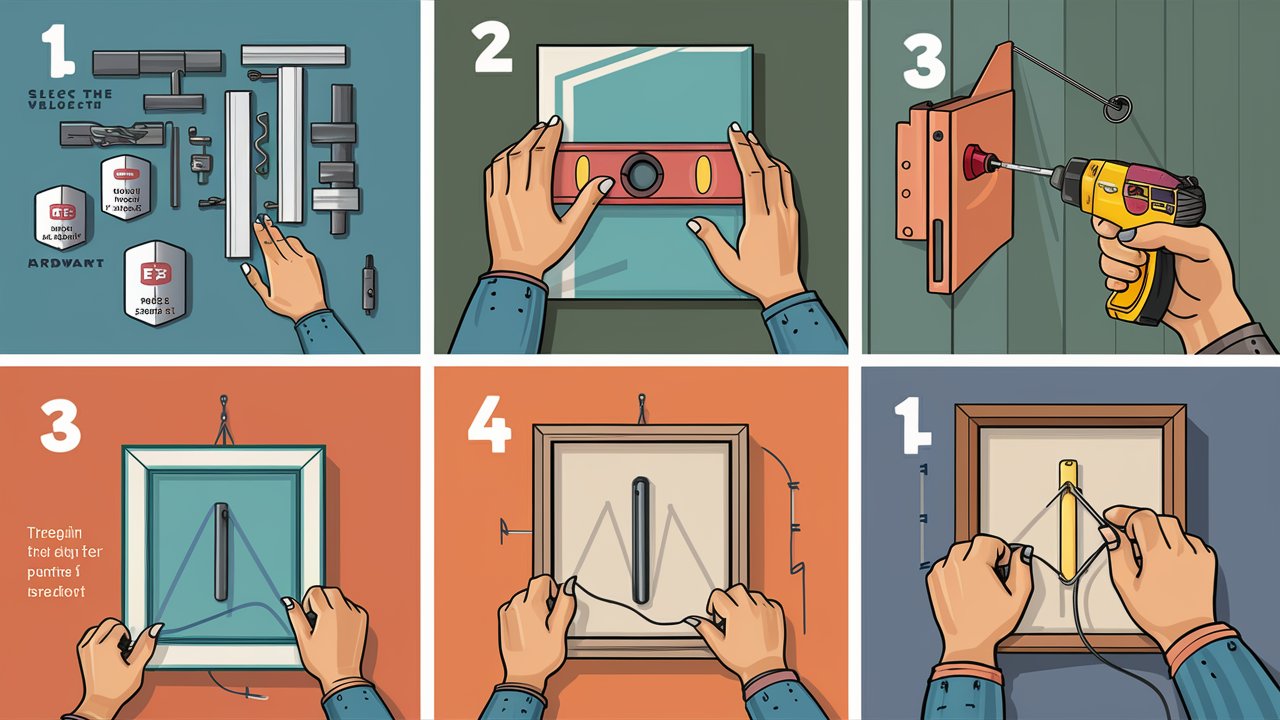
Essential Tools for Hanging a Picture
Before beginning any picture-hanging project, gather the necessary tools. Having the correct equipment makes the process faster, safer, and more accurate.
Common tools include a measuring tape, pencil, level, hammer, screwdriver, wall anchors, picture hooks, nails, and a stud finder. For heavier artwork, you may also need drill bits and power tools.
A level is particularly important because even a slight tilt can be noticeable from across the room. Measuring tools help ensure proper spacing and alignment, especially when creating gallery walls or displaying multiple frames together.
Professional-looking results usually begin with proper preparation and accurate measurements.
Choosing the Best Location
One of the most important steps in hanging a picture is selecting the right location. Many people instinctively place artwork too high on the wall, which can make rooms feel disconnected and uncomfortable.
Interior design experts generally recommend hanging artwork so that the center of the piece sits approximately 57 to 60 inches from the floor. This height aligns with average eye level and creates a comfortable viewing experience.
When hanging artwork above furniture such as sofas, beds, or consoles, leave approximately 6 to 12 inches of space between the furniture and the bottom of the frame. This helps visually connect the artwork with the furniture beneath it.
Room size, ceiling height, and furniture arrangement should all influence your final placement decisions.
Understanding Different Wall Types
Different wall materials require different hanging techniques. Understanding your wall type helps ensure secure installation while minimizing damage.
Drywall is the most common wall surface in modern homes. Lightweight frames can usually be supported with picture hooks or nails, while heavier pieces require wall anchors or studs.
Plaster walls are harder and more brittle than drywall. Special care is required to prevent cracking. Using pilot holes and appropriate hardware is often recommended.
Brick, concrete, and masonry walls require masonry anchors and specialized drill bits. Although installation takes more effort, these walls can support substantial weight when proper hardware is used.
Knowing your wall type helps you select the safest and most reliable installation method.
How to Hang a Picture on Drywall
Drywall installation is one of the most common picture-hanging scenarios. Begin by measuring and marking the desired location with a pencil.
If the frame is lightweight, a simple picture hook or finishing nail may be sufficient. Insert the nail at a slight downward angle for added holding power.
For heavier artwork, locate a wall stud using a stud finder. Studs provide the strongest support and are ideal for large frames, mirrors, and decorative pieces.
If a stud is unavailable, use wall anchors designed for the weight of the picture. Follow manufacturer instructions carefully to ensure maximum holding strength.
After installation, use a level to verify that the picture hangs perfectly straight.
How to Hang a Picture Without Nails
Many renters and homeowners prefer damage-free hanging solutions. Fortunately, several modern products make it possible to hang pictures without traditional nails or screws.
Adhesive hanging strips are among the most popular options. These products attach directly to walls and picture frames while allowing easy removal without leaving holes.
When using adhesive strips, clean both the wall and frame surfaces thoroughly before installation. Dirt, dust, and moisture can reduce adhesive effectiveness.
Weight limits vary depending on the product, so always check packaging instructions before use. While adhesive systems work well for lightweight and medium-weight frames, very heavy artwork may still require traditional mounting hardware.
Creating a Gallery Wall
Gallery walls have become increasingly popular in modern interior design. A gallery wall combines multiple pieces of artwork, photographs, and decorative elements into a coordinated display.
Successful gallery walls begin with careful planning. Arrange frames on the floor before making any wall holes. Experiment with spacing, alignment, and overall composition until you achieve a balanced design.
Maintain consistent spacing between frames, typically two to four inches. Consistency creates a cohesive appearance while allowing each piece to stand out individually.
Gallery walls work especially well in living rooms, hallways, staircases, home offices, and bedrooms.
Common Picture Hanging Mistakes
Several common mistakes can negatively affect the appearance of wall décor. One of the biggest errors is hanging pictures too high. Artwork should generally remain close to eye level whenever possible.
Another mistake involves using inadequate hardware. Choosing hooks or anchors that cannot support the frame’s weight increases the risk of damage and accidents.
Ignoring wall measurements can also lead to uneven placement and poor visual balance. Always measure carefully before making holes.
Finally, many people fail to use a level. Even slight crookedness becomes highly noticeable once the picture is mounted.
Avoiding these mistakes can significantly improve your results.
Professional Tips for Perfect Results
Professional decorators use several techniques to achieve flawless picture placement. One useful tip involves cutting paper templates matching the size of your frames. Tape these templates to the wall to visualize placement before installation.
Another technique involves using painter’s tape to mark alignment lines and spacing measurements. This helps maintain consistency throughout the installation process.
Consider room lighting as well. Natural and artificial light can dramatically affect how artwork appears throughout the day.
When displaying multiple frames, treat the entire arrangement as one visual unit rather than focusing solely on individual pieces.
Small details often make the biggest difference in achieving a professional appearance.
Maintaining Your Wall Display
Once your pictures are installed, occasional maintenance helps keep them looking their best. Dust frames regularly using soft microfiber cloths. Inspect hooks and anchors periodically to ensure they remain secure.
Temperature and humidity fluctuations can affect both artwork and hanging hardware over time. Maintaining stable indoor conditions helps preserve your collection.
Reevaluate placement occasionally as furniture arrangements change. What worked in one layout may require adjustment in another.
Regular maintenance ensures your wall displays remain attractive and secure for years to come.
Conclusion
Learning how to hang a picture properly is a valuable skill that can significantly enhance your home’s appearance. From selecting the right location and hardware to understanding wall types and placement techniques, every step contributes to creating a polished and professional display. Whether you are hanging a single family photograph, a large piece of artwork, or an entire gallery wall, careful planning and accurate installation make all the difference.
By following the techniques outlined in this guide, you can confidently hang pictures that look beautiful, remain secure, and complement your home’s overall design. With the right tools, proper measurements, and a little patience, anyone can transform blank walls into attractive focal points that add personality and style to any room.
Frequently Asked Questions (FAQ)
What is the best height to hang a picture?
Most designers recommend placing the center of the picture approximately 57 to 60 inches from the floor.
How do I hang a heavy picture safely?
Use wall studs whenever possible. If a stud is unavailable, install heavy-duty wall anchors rated for the picture’s weight.
Can I hang a picture without nails?
Yes. Adhesive hanging strips and removable wall hooks offer damage-free alternatives for lightweight and medium-weight frames.
How far above furniture should a picture be hung?
Typically, leave 6 to 12 inches between the furniture and the bottom edge of the frame.
How do I make sure a picture is straight?
Use a level during installation and make small adjustments after hanging the frame.
What tools do I need to hang a picture?
Basic tools include a measuring tape, level, pencil, hammer, picture hooks, and appropriate wall anchors.